Showing posts with label Handles. Show all posts

Tuesday, July 1, 2014

My New Door Handle Design!!

If you've been following my blog this is the ultra high level double top secret project I've been working on!

The standard exterior door handle from Van's Aircraft is very simple, which is what Van's Aircraft was probably going for. And the interior workings are very clever in the way they complete a complex task using a very small amount of machined parts. It's simple enough for an amateur to assemble. But the design left me with a bit to be desired.
Van's Exterior Handle

They designed a beautiful airplane and the handle just doesn't do the aircraft justice. I was left wanting more. So I started brainstorming. I originally started researching the flush handles, but found the install to be pretty complicated and labor intensive. Plus they didn't include a lock, you had to come up with something on your own. The other downside was the safety release pin is not included the handle either. You had to have a "button" or pin hole on the outside of the door to push while turning the handles to open the doors. Requiring two hands to open a door seemed ridiculous to me. I also wanted something that would work with the Planearound Third Door Latch. The latch from Planearound is a must in my mind for rigidity and safety reasons alike. 

So I wanted a handle that:
1. Was easy to install.
2. Still used the safety pin from the original design.
3. Incorporated a lock.
4. Could be used with Planearound 180 degree third door latch.
5. Could be used with one hand.
6. Was aerodynamic.
7. Looked great and complemented this beautiful airplane.

So I hit the drawing board - a.k.a. Solidworks - and got to work. And after many months of work, trial fits, and prototype installs I developed this:


The Low Profile Handle is made from aluminum alloy and a high strength and corrosion resistant stainless steel inner ring. The handle replaces the standard RV-10 Van’s aircraft exterior handle that is supplied in the finishing kit. The handle has an aerodynamic design while maintaining the safety lock feature of the original design. The design also includes a location to install a lock flush with the handle giving the door a finished and well crafted look. Existing, installs can be retrofitted with the new handle.

The handle operates in a similar manner as the original Van’s handle; with the exception of the safety latch release button which is replaced with a lever action integrated into the handle design. The center of the circle is pushed lightly with the thumb releasing the safety latch mechanism and causing the back end to pull away from the door allowing access to grip the handle. The handle is then twisted to open the doors. The degrees of rotation are not limited allowing use of the 180° Planearound Third Latch if desired.

The handle is approximately 1/3rd the height of the stock Van’s handle reducing drag and improving the aesthetic appearance of the aircraft. The professional fit and sleek design are right at home on the modern and aerodynamic RV-10.


I owe many thanks to Geoff and Zac at Aerosport Products. Without them this would not have become a reality. We have been working on this design for many months now and are excited to say, that after some prototype installs, we plan on bringing this design to market! A price has not been decided yet. But I can tell you the work these guys produce is top notch!

Here are some pictures of the first prototype installed on my airplane...


Tuesday, February 18, 2014

Door Handles and Planearound Latch

The handles take a lot more work than what you think. It feels like a lot of running around in circles. You complete a few steps than need to take things apart only to put them back together again. There is timing of the door pins, correct thread lengths, and all kinds of fitting and clearance issues. I now have the door latches in working condition with the pins installed. The handles slide the rods back and forth pretty smoothly. So I am happy with the result thus far....although it felt like a lot of work to get here.

Dates and Times
Sun 9th -3.75 hrs- Door latch work
Mon 10th -1.25 hrs- Door latch work
Tues 11th -2.0 hrs- Door latch work
Wed 12th -4.5 hrs- Door latch work
Somewhere during this time I also located the pin holes and test fitted the LH door.

Total Time on Doors
48.5


This is how I safety wired my rack attach pins. The safety wire goes through the pin twice for extra strength and to prevent any movement in the pin.


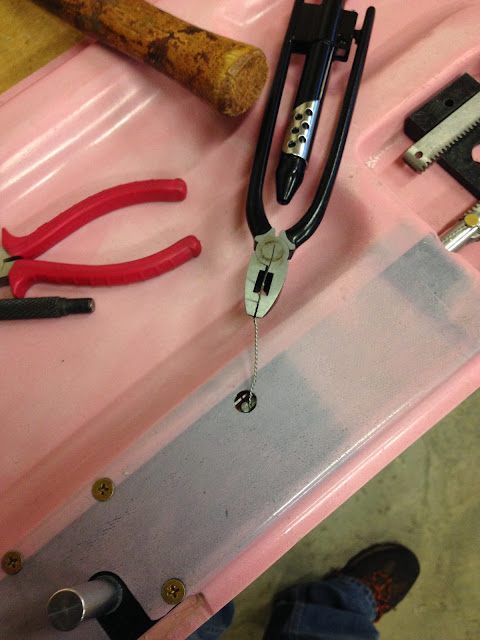
The plane around third latch instructions have you drill a small hole to install a pin through their rack and an attaching rod. To prevent movement in the pin you are supposed to safety wire the pin in place. Ideally you want the safety wire wrapped around the rod to prevent the pin from falling through the rod or pulling out. (note the pin is shown in top LH corner of the pic below) The next couple pictures show how I got the safety wire around a rod through a very small hole.

First I wrapped the safety wire losely around the rod and tucked the ends into the hole. This allowed me to insert the rod into the door while also holding onto the safety wire.

I then inserted the rod into the door and found the wires through the small hole.

I then pulled the wire out using some needle nose pliers. I kept pulling until the wire was now wrapped around the rod where the pin is located instead of near the end (like in the first picture). I then inserted the wires through the pin as shown below.

Pull the wire and move the pin into position simultaneously then tap the pin into place.

Twist the wire.

Clip the excess and tuck into the hole. Pin installed and safety wired.


Handle, latch, and pins installed on doors.

LH door installed.

Locking the door pulls everything in and sits flush with the outside of the airplane.


We got some snow down here in Alabama!...a rare occasion. The couple inches of snow made Jess and I realize just how much we miss the white fluffy stuff. This is the first accumulating snow fall since I built the workshop a few years ago.

Tuesday, February 4, 2014

Prepping For Handle Install

With the doors fit I need to get the handles installed to find out if I need to make any final adjustments to the fit and trim. So it's back to working on the handles, pins, and Planearound third latch install.

I'll let the pictures tell the story...

Date and Time
February 2nd
-4.75 hrs- Worked on prepping doors for handles, latches and Planearound third latch


Total Time on Doors So Far
37.0 hrs

First you use the Vans plastic blocks to drill the proper hole locations. The Vans blocks need to be trimmed and shaped in order to fit in the pockets.

Then it's time to trim the planearound block to fit in the same pocket.

I slid a drill bit through the center hole to align the blocks. I then marked the planearound block for it's initial cut. After cutting and then shaping the block to slide into position in the pocket you match drill from the outside into the planearound block from the holes you made earlier.

Don't forget to cut the racks in half and NOT per the plans...luckily I remembered.

I highly recommend this bit on the dremel to cut out small holes in any of the fiberglass. They work really well. This is the initial cut for the third latch mechanism.

You then mark a hole and open it up to 0.5" (If I remember correctly). I used the same bit to align the holes and the outer part of the third latch mechanism. I then match drilled into the inner skin for the screw holes.

After I drilled all the holes I finished making the slot that is need to install the latch. I cleaned up the opening and epoxied the spacer blocks into place. The third latch kit includes small hollow blocks to reinforce the area around the latch mechanism. I filled the blocks full of epoxy/flox and then forced them into position. Look inside your door before things dry to ensure no epoxy will be blocking the rods that are installing in there later

I also cut open the access holes for the racks in the side pockets.

Friday, January 31, 2014

Door Handles

I started the door handles last weekend. I wanted to get an understanding of how all the components worked and I just needed a break from the fiberglass. The handles are actually a very simple design once you look things over. A quick study of the plans and holding the parts in your hands it's all takes to get how the things assemble.

The next day I sanded the LH door to it's final size. This took maybe 4 or 5 trial fits and sanding before I got it to a final shape I liked. I also finished installing the hinges on the LH side (RH was completed before). I also made a small 0.25" block to slide along the interior door skin and mark the door gutter on the cabin. The gutters will be sanded down to the 0.25" mark to allow adequate gaping for the McMaster Carr door seals.

Dates and Times
25 Sat  -3.5 hrs- Started working on handles. Also rearranged and cleaned up the shop but this isn't included in the time.
26 Sun -4.75 hrs- Sanded LH door to final size. Finished hinges. Marked gutter edge for cut.

Total Time on Door So Far
24.0 hrs

I had to polish the inside of the handle tube so the internal pin would fit and slide better.

This is how I installed the safety latch pin. I used a zip tie to hold the spring back and held the pin in place with vice grips. The vice grips also slightly squeeze the pin to aid in hammering it into the hole. Be sure to not squeeze the pin where the two sides touch each other as this might damage the pin and it won't stay in the hole as it's designed. Also, I had to open up the slot in the handle tube quite a bit to allow the pin to slide freely up and down.


The handle resting in place inside the door.


The exterior handle sitting in position in all it's ugly glory.


A shot of the progress thus far...see how the upper forward fuselage is installed!