Sunday, July 22, 2012

Finished Bulkheads

I haven't posted in a while....been busy. I did a little flying too! Shot some approaches in actual IMC, always fun. I have squeezed in just enough time, throughout the week and today, to finish the bulkheads and reinstall the replacement longeron in the tailcone. There a lot of large rivets and nutplates to install in the bulkhead and frame parts. I had to turn the pressure up on the rivet gun. The biggest challenge with the larger rivets is holding everything straight while smashing the rivets. All the nutplate rivets I could use the pneumatic squeezer, which was nice. The parts looked great together alodined. Once this entire section is complete then I'll prime. Now that they're done I set the large bulkhead frames aside and soon I'll get back to the tailcone. Attached is a picture of how the longeron should have installed.
(2.0) weekdays (5.0) Sun

Monday, July 16, 2012

Bulkhead Work

Only a little bit done tonight. Installed nutplates and some parts onto the bulkhead with a field of rivets. (1.5)

Sunday, July 15, 2012

Fuselage Bulkheads

Since I screwed up on the tailcone longeron I started the fuselage section. The first thing to do is build the main bulkheads and frames, some of which are substantial in size and weight. This weekend I got them clecoed, drilled, deburred, and alodined. The largest bulkhead parts came alodined so I decided to do things a little differently, instead of priming and then assembly I would alodine the parts assemble the entire section and then prime. A lot of the parts are really thick clad or bare aluminum and need to be alodined, so I'm hoping this will allow quicker progress. One neat trick the plans call for when drilling the steel landing gear braces is to use a drill bushing. This allows the holes to be started perfectly concentric with the larger hole and not damage the thick aluminum in the process. Then separate the pieces and open up the holes to the final size. Pretty smart.

The longeron I ordered earlier in the week has already arrived. $13 part and $14 shipping, not bad. But, I'm going to finish the fuselage bulkheads and frames and then get back to the tailcone.

Sat (5.5) Sun (4.0)

Thursday, July 12, 2012

Hey, it's my birthday

The big 29 today!

I only had a little bit of time today so I used it emptying out one of the boxes containing bags full of hardware and small parts that go to the fuselage. Laying all of them out will make it a lot easier to find things.

Wednesday, July 11, 2012

Ugh!

It's really frustrating to discover that you have made a mistake. Upon first realization there is the moment of disbelief, the excuse, and then the reality of your mishap. Quickly you move into the questioning of "how did this happen" or "why am I such an idiot"! Then just self anguish and embarrassment for a day or so.

So you guessed it, I screwed up. When cutting the longerons, well a single longeron, the instructions called for 68 3/8" and I cut 67 3/8". I didn't discover the mistake until last night when match drilling this longeron and on the last hole there wasn't anything to drill into. A project that is this hands on and with a single builder all mistakes will be discovered before the part is finished. The damage and frustration escalates as the part progresses closer to that finishing point. This particular incident occurred early enough to only cause a very minimum amount of rework.

So a new part is on order and until it arrives I'm going to start on the fuselage. Most of tonight went to moving the tailcone off the table and to the floor and then bringing fuselage parts down from storage in the loft. Not a whole lot done in the past two days. Tues and Wed (2.0)

Sunday, July 8, 2012

RV-10 Tailcone

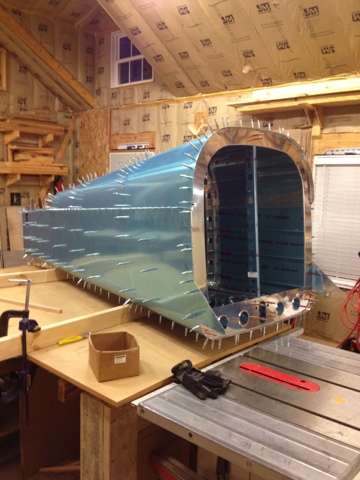
The tailcone goes together pretty quick. All of the longerons and stiffeners have to be match drilled, but once you drill out one the pace increases with the others. There are a lot of holes to drill, giving the air compressor a pretty good workout. To work on the tailcone the instructions say to use 38" tall sawhorses. I decided that it would be better to clamp two 2x4s on end to the table letting one side of them overhang. This would allow movement around and under the part a lot easier without sawhorse legs getting in the way. Also making moving and rolling the part really easy and since I left the blue film on the skins i didn't need to worry about scratches. You start building the RV-10 tailcone upside down letting the frames hang on the lower skin. Then the stiffeners and longerons are attached. The side skins go on with a little bit of work and force to get the frames lined up in the large corner radii. After that roll the thing right side up and continue clecoing parts on. There are two really thick pieces of angle extrusion that run the entire length of the tailcone that form the main longerons. Before installing them they need a 2 degree bend in them formed by a vice and a mallet. I was a little skeptical of this step at first but the parts turned out great and my repertoire of metal bending at home has now expanded.

Being able to roll the entire part over was a major help while building this thing. I don't know if anyone out there is building an RV-10 but if so I highly recommend the 2x4 set up. Also the frames need to be fluted and this causes the edges of the frame tabs to curl up and could cause an ugly bulge in the skins. So I curled only the edges of the tabs back down to prevent this. --Look at that! Applying a lesson learned from the horizontal stabilizer : ).

The upper skins of the tailcone come flat and are shaped as you cleco them in place. I had to give the entire part a good bear hug a few times to hold the skins in place while clecoing with the free hand.

Looking at the pictures it appears I'm nearly finished with this section, but don't be fooled, I still need to deburr, dimple, prime, reassemble, and rivet.....a long way to go.

Sat (5.0) Sun (6.0)


Thursday, July 5, 2012

Completed Structure Overview (173.5hrs)

As promised, here is an updated overview. The part in work is highlighted red, the tailcone, and the completed parts are highlighted blue.

Total Time 173.5 hrs

Wednesday, July 4, 2012

Happy 4th of July

What better way to celebrate your independence than building an airplane! : ) Today, before the festivities began, I continued work on the tailcone. I deburred and clecoed the frames and bulkheads. I forgot how big this part is until I had to get the skins down from the loft and laid them out on the 8ft long table! The bulk of the time went to cutting out all the longerons. (4.0)

Tuesday, July 3, 2012

Back to the Build

Now that the desk is complete, a long three weeks including late nights at work and busy schedules, I got back to building the airplane last night. After sweeping up all the saw dust, the workshop was converted back to a sheet metal shop and solo airplane factory. I am starting on the tailcone, as this is the last part to complete in the empennage! And you can expect an updated completed structure overview in the near future to indicate the area of work in progress. Last night was mainly spent as described above with cleaning the shop but I got about an hour of work in making the aft tie down fitting and a couple parts of the bulkheads. I've noticed there have been an increase in parts you have to cut, shape, and match drill in this section. I wonder if this is going to continue into the fuselage. Tonight I continued on some bulkhead pieces, nothing major. I noted that one of the service bulletins and associated parts is included in my kit and set of plans. Good to know they keep the kits up to date on any changes they (Vans Aircraft) make.

Oh, I did build a rack to store the completed stabilizers and elevators in hopes of keeping them a little safer than just laying around in the shop. Mon (1.0) Tues (2.5)