
Wednesday, September 19, 2012
Firewall
This part of the instructions are kinda vague. It seems like entire steps are missing and the sequences should be in different orders. Be careful on the entire section; read the entire thing and look at the figures thoroughly. Parts that need to dimpled or countersunk are left out. You figure it out because of separate parts that connect to them, but it's a little frustrating and I hope this isn't a sign if what's to come. (2.0)
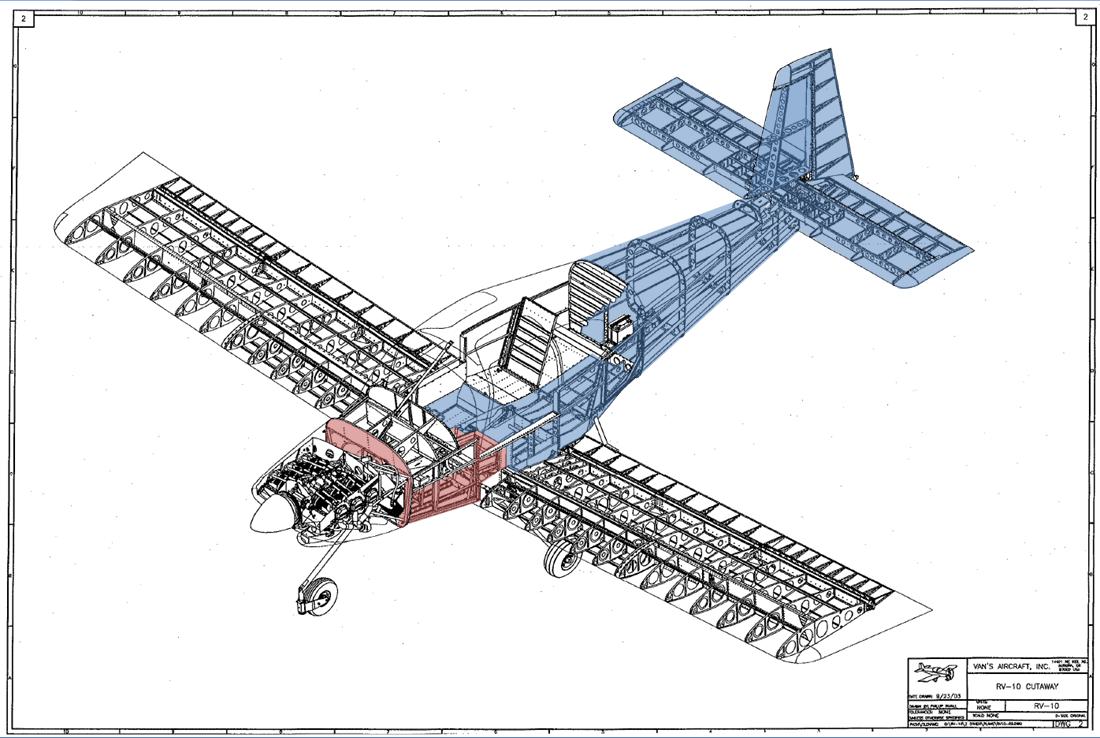
Completed Structure Overview (286.0hrs)
Here is an overview of what I have completed. The highlighted red parts are in work and the highlighted blue parts are complete.
Total Time 286.0 hrs.

Total Time 286.0 hrs.
Tuesday, September 18, 2012
Lower Fuselage Completed
Adam stopped by after work and we finished riveting the skins onto the aft lower fuselage. Thank you Adam! This completes another big part. The shop is kinda getting full of what feels like random airplane parts; tailcone here, horizontal stabilizer there.
I started the firewall assembly yesterday and continued working on it today. The firewall itself needs to be dimpled with the flush side of the rivet on the forward side. NOTE: use caution when dimpling because two nutplates install on the opposite side of the rest of the nutplates! I used the dimpler for most of the part but the holes near the edges needed to be done with the pneumatic squeezer. To do this I set the firewall on a board hanging off the table, see pic. Easy to turn and move the part as needed.
Monday (2.0) Tues (4.5)
Monday, September 17, 2012
Lower Fuselage Riveting
There are some very difficult areas to rivet in the lower fuselage ribs and bulkheads. I screwed up a few rivets then had to drill them out and do it again. This just increases your frustration and you wind up screwing more up. I inspected every rivet after putting them in and I feel good about the finished product. Saturday was spent on the frames and Sunday went to the skins. I had a good friend help me out on the fuselage skins since you can not do this by yourself. It was some awesome help and I couldn't believe how fast it went. Although we didn't get the entire part done, he is going to stop by later in the week to help me finish the aft skin. Thanks Adam!
Sat (8.0) Sun (8.0)


Sat (8.0) Sun (8.0)
Friday, September 14, 2012
Lower Fuselage
Deburred all the parts of the lower fuselage and dimpled them too. Not having all the parts riveted together, like the plans have, made this a lot easier. I also primed the parts outside taking advantage of the nice day. (8.0)

Thursday, September 13, 2012
Tailcone Completed
I finished the tailcone today, well it's not completely done. The top skins are staying off because I will need access to the static port hole. Plus, I still haven't decided on a few other things and I still may need access to aft part of the tailcone. The back riveting was easy on the last skin but finishing this thing was a little difficult. The tailcone got very restricted further aft making a really tight place to work. Parts became difficult to rivet. For instance the rudder stop stiffeners (PN F-1055) are riveted to the rudder stop brace (PN F-1056) with two solid rivets on each side (see pic of view looking down into a hole, note the wadded up paper at the bottom for padding in case I drop the bucking bar it won't dent the skin....lesson learned the hard way). Anyway, it's impossible to rivet these without a really long rivet set, of which I do not own. So I decided to put MSP-42 pop rivets in instead. I checked the numbers and it looks like the thin aluminum will fail before the #4 rivet will, solid or pop rivet, so in they went. All in all the tailcone looks really good, kinda looks like an aluminum canoe but that's ok. Back riveting is absolutely the way to go for these skins and I also recommend leaving one side of the skins off when starting out. Once I finished the tailcone I went back to work on the lower fuselage, but didn't get to far before it was time to call it a night. (9.5)


Wednesday, September 12, 2012
Tailcone Riveting Contd
I continued riveting the tailcone today and it is really easy with one of the side skins removed and so far no problems with doing it this way. I riveted the entire lower and right hand side skins. I also went ahead and riveted the bell crank ribs even though the instructions have you install these after all the skins are on. It too was a lot easier to install with one of the side skins removed. I had trouble reaching some of the rivets that came through the skin behind one of the stiffeners. I couldn't reach the tail of the rivet with the back rivet set and my normal bucking bar was too thick to fit as well. So I made a new bucking bar. I used an old part from a different project that is made of a strong steel. I then cut a notch out of one of the sides to fit around the stiffener. The picture will help explain. Yeah I know they make bucking bars with this shape and I used up some time today making this one, but it was free and I got to continue working and not wait on a shipment. After bucking the rivets I couldn't reach with the back rivet set I finished the night clecoing the left hand skin on for tomorrow (6.5)


Tuesday, September 11, 2012
Tailcone Riveting
So I decided to leave one of the tailcone side skins off for easier access to the lower skin and stringers while riveting. First I relocated all the clecos to the inside of the tailcone so only the little ends were poking through the outside. Then I used foam to raise the tailcone up the same thickness as my back rivet plate, slid in ten rivets, used riveting tape to hold them, lined up the steel plate, and started riveting. Ten rivets in less then a minute. Realign and repeat. Back riveting is awesome. The rivets come out perfect and even more flush then how they started out, plus it's fast. (1.5)
Additional news! With all the extra time I've put in at work, and the project being complete, I'm taking the rest of the week off. I hope to dedicate all my time to the airplane in hopes of regaining the lost time.


Additional news! With all the extra time I've put in at work, and the project being complete, I'm taking the rest of the week off. I hope to dedicate all my time to the airplane in hopes of regaining the lost time.
Sunday, September 9, 2012
Tailcone Final Assembly
I started the final assembly of the tailcone today. First you rivet a lot of smaller parts together: frames and bulkheads etc. I finished out the day with clecoing the tail skins and stringers together in the same way as before when I drilled out the skins using two 2x4's hanging off the side of the table. See previous post if you want more detail.
I came across a conundrum at the end of the day. The instructions say to cleco both side skins on and then begin riveting, but how do you reach to rivet the lower skin? So I need to read ahead, and maybe do a bit of research, to see if I can't rivet the lower skin first then cleco and rivet the side skins. I don't see any reason why not....we'll see. (4.0)


I came across a conundrum at the end of the day. The instructions say to cleco both side skins on and then begin riveting, but how do you reach to rivet the lower skin? So I need to read ahead, and maybe do a bit of research, to see if I can't rivet the lower skin first then cleco and rivet the side skins. I don't see any reason why not....we'll see. (4.0)
Delayed Post
So last weekend, I think it was Labor Day, my in-laws canceled their visit which left open a weekend of airplane building. Unfortunately I was a little hindered by having to do some work from home and a few strong thunderstorms, but I persevered and got quite a bit done.
- Finished deburring the tailcone
- Finished dimpling the skins
- Alodined the extrusion parts
- Drilled out the fuselage skins
- Cleaned and primed the tailcone parts
I needed to prime the parts inside my shop, thunderstorms remember, so I created a temporary paint booth. Plastic sheathing was draped across the walls on one end of the shop. To create a barrier between the rest of the shop I made a beam that spans the width of the shop with the sheathing attached. You then can roll up the sheathing and store the hole thing under the loft out of sight....convenient and works great.
The entire weekend about 9hrs
Subscribe to:
Posts (Atom)