

Sunday, April 29, 2012
More Elevator
Really the most difficult part of the elevators so far was drilling the trim cable anchor brackets. They're made from a very hard steel, so drilling them takes forever. I started by using a punch to make a small indentation to prevent the drill bit from walking. Then using a smaller bit for the first hole and stepping it up for the final size. Worked ok, but took forever. Most of my time today went to drilling out the skins... tedious. (4.5)
Saturday, April 28, 2012


Fly In and Elevator Start
With an airplane booked, and now a free day to fly, we decided to make a quick flight to a nearby EAA Fly In. It was inspiring to see some RVs and meet the guys that built them. I posted some pics. (No that is not the same model that I am building)
After the fly in, I put a few productive hours into the elevators. The parts seem to go together easily with the trickiest part beings the counterweight ribs. They aren't straight, but with some fluting they eventually line up. There is also a bend in the skin that requires cautious work to be sure it's correct on the first try. (3.75)


After the fly in, I put a few productive hours into the elevators. The parts seem to go together easily with the trickiest part beings the counterweight ribs. They aren't straight, but with some fluting they eventually line up. There is also a bend in the skin that requires cautious work to be sure it's correct on the first try. (3.75)
Canceled Trip, Botched Build
We were supposed to fly to St. Louis yesterday but due to storms the trip was canceled, see pic. So I figured I would start the final assembly of the horizontal stabilizer, when I realized... I made a mistake.... I countersank a part when I shouldn't have. If you look back at my picture in the post Alodining the Stabilizer, the long stiffener on the right, it shouldn't have countersunk holes. So now I am reordering this part ($29) and starting on the elevators while I wait for it to come in. Sucks, but I've beat myself up about it too much already. Fri (2.0)

Wednesday, April 25, 2012
Primed and Ready
I got all the parts for the horizontal stabilizer primed tonight. I had all the parts labeled during building. Just marked which side and what number rib it was with a sharpie. But when you prep the parts with MEK that gets removed along with any dirts and oils. So, I laid out all the parts on the table and then wrote on the table which part it was, then once the primer dries, relabel the parts before removing them from the table. Simple and it works. Many ribs are identical, but have been final drilled in a certain spot. So to be sure it goes back in that exact spot, you have to label. (4.5)

Tuesday, April 24, 2012
Prepped for Primer
Finished dimpling the skins for the stabilizer. So I am now ready to prime. (1.25)
Monday, April 23, 2012
Alodining the Stabilizer
I alodined any thick or bare aluminum parts of the horizontal stabilizer tonight. The thick stuff was done due to the exposed non-clad edges and all bare aluminum should be alodined regardless of thickness. (1.5)
Sunday, April 22, 2012
Debur the Stabilizer
I haven't posted in the past few days because there wasn't any significant amount of work done until today. Between helping my uncle sheath the roof of his new garage and getting some IFR approaches in (thanks Caroline!) I didn't have as much time as usual. I have been deburring, counter sinking, and dimpling until my arms cramp up and then fighting through the pain : ). Luckily I had a little help today from a friend and coworker, Adam, and my wonderful wife, Jess, to accomplish quite a bit. All the parts have been deburred and I only have one more of the horizontal stabilizer skins to dimple, woohoo!
Fri (2.0) Sat (2.5) Sun (5.5)


Fri (2.0) Sat (2.5) Sun (5.5)
Wednesday, April 18, 2012
Holy Horizontal
Spent a couple hours drilling holes...lots of holes. Through the skin, ribs, spars then shift the clecos and drill some more. Sorry no pics tonight. (2.0)
Tuesday, April 17, 2012
Back to Horz Stab
Back to work on the horizontal stabilizer! I used all of the clecos I owned on this part...might need to buy more. See the pictures. I'm just putting the parts together to match drill right now. There are two spars that span the entire length and several ribs in between that all need to line up with the skin holes. Some slight movements or realignments of the parts usually gets everything lined up for final drilling. At one point you need to drill in a very small area so I cut one of my drill bits down for clearance. Don't forget to tape the drill head when drilling close to other parts. An accidental touch of a spinning steel drill head will gouge the aluminum. (3.0)


Monday, April 16, 2012
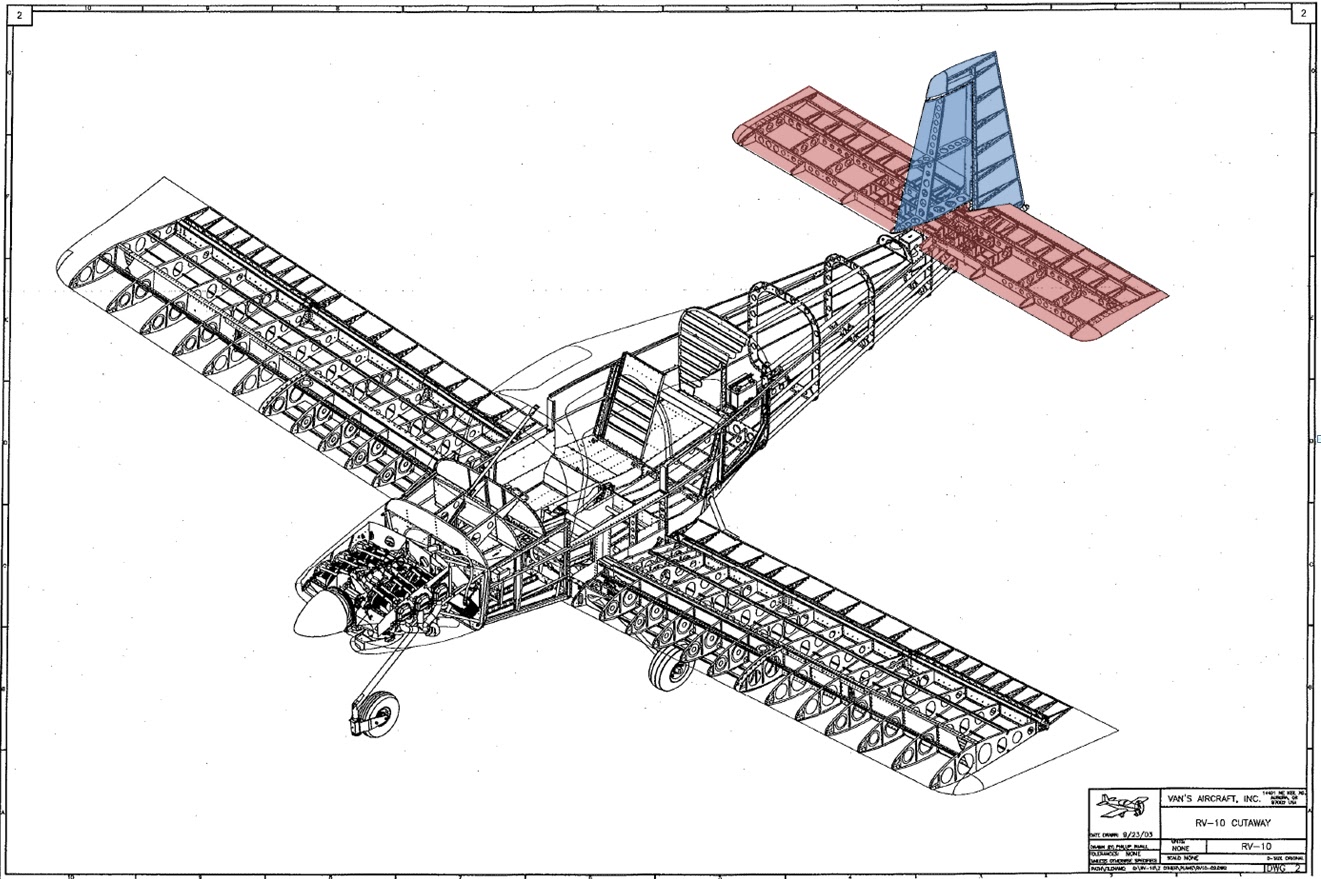
Completed Structure Overview (61.0hrs)
I completed another part so I'm updating the Completed Structure Overview. Below is a picture of all the aircraft structure, if its highlighted blue it is finished and red is in work.
Total Time 61.0 hrs
Sunday, April 15, 2012
Finished Rudder
After a few more hours I finished another part today! The rudder is complete and looks great! I rolled the leading edges using a PVC pipe with match drilled holes so I could cleco the skin to the pipe. This method wouldn't allow any movement in the part while rolling it to form a perfect curve. The trailing edge went together well too. I installed the rivets in alternating orientations; every other rivet facing the same way. This kept everything straight and prevented any accidental curving of the edge. Now that this part is done I'll go back to working on the horizontal stabilizer. (4.75)


Wednesday, April 11, 2012
Yet More Rudder
A little bit of work done tonight. I cleared out the Proseal from the trailing edge holes and riveted the skins to the spar. (2.0)

Monday, April 9, 2012
More Rudder
Worked on putting the two halves of the rudder together tonight. I sealed the trailing edge with Proseal and it will be drying for the next 48hrs. I mixed and applied the Proseal as described here: http://www.pattersonaerosales.com/Misc/ProsealTip.pdf using plastic syringes and it worked really well. While riveting the stiffeners together I held the skin back using some wire letting more wire out as I moved down the rudder, simple and effective. (2.5)
Completed Structure Overview (51.75hrs)
Since I completed a part, I thought I would show where I am in the grand scheme of things. Below is a picture of all the aircraft structure, if its highlighted blue it is finished and red is in work.
Total Time 51.75hrs

Sunday, April 8, 2012
Finished Vertical Stabilizer
Today I finished my first part, the vertical stabilizer! I'm pretty excited and it is really nice to have a part done. I'm even more eager now to get my next part finished. The rudder is next and I even got a start on that today. I back riveted the stiffeners onto the skins; a process that is really easy and quick. Lessons learned on the vertical stabilizer: tape the bucking bar, turn down the air pressure on small rivets and thin skin, and drilling out rivets is easy. Im really happy with the way my first part turned out! (7.5)


Saturday, April 7, 2012
Vert Stab Final Assy Start
As the title states I started the vertical stabilizer final assembly. Now that all the parts are primed I can start riveting things together. Everything goes together pretty easily, every once in a while I had to run the drill through to clean out the holes. I also had a little more practice drilling out rivets as I started installing the hinge brackets on the wrong side...duh...but it's actually a really easy fix. Not much done today, we have a 1yr old's birthday party to go to. : ). (2.5)

Friday, April 6, 2012
Primed
I skipped out of work early on this beautiful day and primed the vertical stabilizer and rudder parts. I prepped the aluminum with a light scrub of ultra fine scotch brite and MEK. I used a cheapie gravity fed spray gun from Harbor Freight and was impressed. I turned the pressure and volume real low to spray a really light coat, no point in adding weight from a thick coat! The 20oz container actually goes a long way. I used the two part epoxy AkzoNobel primer. I even had a little time to cleco some parts together on the horz stabilizer. (5.75)


Thursday, April 5, 2012
Horizontal Stabilizer
An exciting night! First, the horizontal stabilizer ribs and forward spar came together. Then the skins were put into the cradles. You attach the forward ribs one by one and watch the skins start forming a wing! Hopefully I can work on it tomorrow to get the entire stabilizer clecoed together! A little dorky to be this excited, I know, but it's pretty awesome to see a part this big taking shape. (2.75) 


The Workshop
Cool shot of the airplane factory! Building the shop was a lot of fun and very rewarding. A gotta feeling an airplane might outdo it a little! : )
Wednesday, April 4, 2012
Rib and Stabilizer
The replacement rib came in yesterday. So I worked on it first, using the damaged rib as a reference for what needed to be done. It was actually really easy and quick. Now that all the parts are complete for the vertical stabilizer and rudder I can prime them this weekend!
I mainly worked on the horizontal stabilizer tonight. Including cutting small elliptical holes in the leading edge ribs and making cradles to support the parts when working on them. It's all called out in the plans but you do need to make the cradles yourself. The elliptical holes really need to be deburred well and the edge radii need to be left as large as possible. This is a spot I could see a future crack forming. (3.0)

I mainly worked on the horizontal stabilizer tonight. Including cutting small elliptical holes in the leading edge ribs and making cradles to support the parts when working on them. It's all called out in the plans but you do need to make the cradles yourself. The elliptical holes really need to be deburred well and the edge radii need to be left as large as possible. This is a spot I could see a future crack forming. (3.0)
Sunday, April 1, 2012
Started Horizontal Stabilizer
I started the horizontal stab today since I'm still waiting for that replacement rib for the vertical stabilizer. Once that part comes in I will prime all the parts for the vertical stab and rudder then begin final assembly of both parts.
The spars for the horizontal stab are about 11ft long! It hangs off both edges of the work bench. There is a lot of tedious work in the beginning of this part. You have to cut out and shape some attachment brackets and match drill several pieces. I did all the cutting using my table saw, going very slowly, and the parts came out fine after sanding. (3.75)
The spars for the horizontal stab are about 11ft long! It hangs off both edges of the work bench. There is a lot of tedious work in the beginning of this part. You have to cut out and shape some attachment brackets and match drill several pieces. I did all the cutting using my table saw, going very slowly, and the parts came out fine after sanding. (3.75)
Subscribe to:
Posts (Atom)