Showing posts with label Workshop. Show all posts

Thursday, July 3, 2014

Flying Magazine Article

The shop I built was featured in the July issue of Flying magazine! I'm pretty excited to have made it into the article about cool hangars. The author of the article really liked the idea of featuring a building that was designed and built with the airplane in mind.

Thanks to Pia and Flying Magazine for making my building experience even cooler!


Here is the article on their website!


Monday, May 19, 2014

Window Edging

I've been holding off on writing this blog until I finished up the task. Well, it took A LOT longer than what it was supposed to. 

Dates and Times
April
Wed 30 -1.5hrs- finished light wiring 
May
Sat 3  -5.5hrs- window edging prep
Sun 4 -5.5hrs- window edging laid up
Mon 5 -1.5hrs- window sanding and disaster
Tues6 -1.0hr- sanding off old stuff
Wed 7 -1.25hrs- more sanding
Sat 10 -6.5hrs- window prep and laid up new layer of fiberglass
Sun 11 -3.0hrs- more sanding
Tues13 -0.5hr- more sanding
Sat 17 -2.5hrs- so much sanding
Sun 18 -3.0hrs- more sanding and cleaned out the shop

I started off masking and sanding all of the windows. I used the same tape as I did for the windscreen fairing.

A closer shot of everything taped off. I used the same little jig tool to draw a line around the window offset from the edge to place the tape. The radius's at each corner are from circles I printed off on paper of many different sizes. I then cut out the radius I wanted which made a good template for the curve.

Here is a shot of the edge of the door. You can see how I placed tape around the entire perimeter of the door, two layers of duct tape and a layer of electrical tape. I then cut it even with the outer skin of the door. This will result in an even gap around the entire door. You can also see in this picture how the door has a nice sloping curve and the cabin top does not resulting in a slight misalignment.

I then taped around the edge of the door and onto the outer skin to prevent fiberglass adhering to the door itself. In this image you can also see a flat spot on the cabin top in relation to the door....its right in the middle of the picture.

With everything taped up I laid my first bit of fiberglass. First I filled the gaps around the edges of the windows and then laid 2" fiberglass cloth down. The strips were cut from the same type cloth used in the windscreen. I only did around the top of the windscreen and the back windows at this point.

The next day I came out to start sanding everything down when I discovered that nothing was sticking. The glass cloth was peeling off in strips....not good.

This resulted in days of sanding and scraping to get all the old stuff off the plane. It was a major pain in the butt and very disappointing. This set me back a few weeks of work.


I think I know what happened:
1. Original: sanded with orbital sander and 60 grit paper. The orbital didn't "scratch" up the surface enough. New Layup: used 60 grit paper and sanded in 90 degree patterns creating a "scratched" cross pattern around the entire perimeter.

2. Original: cleaned with acetone and therefore smoothed out the ridges from sanding.
New Layup: cleaned with just water.

3. Original: Laid cloth down and applied a thickened epoxy. I was thinking of preventing runs but resulted in cloth not absorbing enough of the resin to harden and adhere properly.
New Layup: wetted entire perimeter with just epoxy and then did a very wet layup of the fiberglass using non thickened epoxy.

The second time I did this the layup looked much nicer than the first. Practice is everything.

This time I also picked up a flexible sanding block and adhesive backed paper. The sanding block is very important to getting a nice gentle curve. VERY important...basically not possible without it.

The second layup stood up to the sanding and trying to peel it off. So with my new sanding block I started sanding, sanding, and sanding. Here is a picture of the old intersection I showed above. Looks much nicer now.

An overall picture. So much sanding. I am not really enjoying this part. Fiberglass dust is awfull stuff.

I finally got a point that I can say I am finished for now. The dust was so bad in the shop dunes were starting to form. I just pulled everything out and blew it off with the air hose. My next goal is to finish a few things up in the tail so I can rivet that last skin on. Then I will finish the rest of the body work for good.

The Engine Has Arrived!

Its here! A brand new, straight from Williamsport, Pennsylvania, Lycoming engine! The Lycoming IO-540-D4A5 is a six-cylinder, horizontally opposed, 541.5 cubic inch displacement, normally aspirated, fuel injected, beast of an engine weighing in around 438lbs.


Here it is all crated up and taking up my parking spot in the garage.


All I've done is cut open the top of the box and look inside....and drool a little.
The engine is all sealed up and snug in its nest of foam packing. 


Lycoming started as a sewing machine company back in 1845. Later they diversified to bicycles and typewriters. Then in 1907 the company was restructured into the Lycoming Foundry and Machine Company and started to produce automobile engines. Providing engines to auto manufacturers like Auburn.

Then as aircraft became more prominent and  power hungry, Lycoming entered the aviation field by producing its first aircraft engine, the R-680 Radial nine cylinder engine in 1929. The company had many "science experiments" trying to find its place in the aviation world until it finally settled on general aviation aircraft after World War II.

The engine will stay tucked away in the garage until I'm ready to hang it on the airplane. At which point I'll have an unpacking and moving day of the 438lb beast from the garage to my workshop. Won't be long now!

Tuesday, February 18, 2014

Door Handles and Planearound Latch

The handles take a lot more work than what you think. It feels like a lot of running around in circles. You complete a few steps than need to take things apart only to put them back together again. There is timing of the door pins, correct thread lengths, and all kinds of fitting and clearance issues. I now have the door latches in working condition with the pins installed. The handles slide the rods back and forth pretty smoothly. So I am happy with the result thus far....although it felt like a lot of work to get here.

Dates and Times
Sun 9th -3.75 hrs- Door latch work
Mon 10th -1.25 hrs- Door latch work
Tues 11th -2.0 hrs- Door latch work
Wed 12th -4.5 hrs- Door latch work
Somewhere during this time I also located the pin holes and test fitted the LH door.

Total Time on Doors
48.5


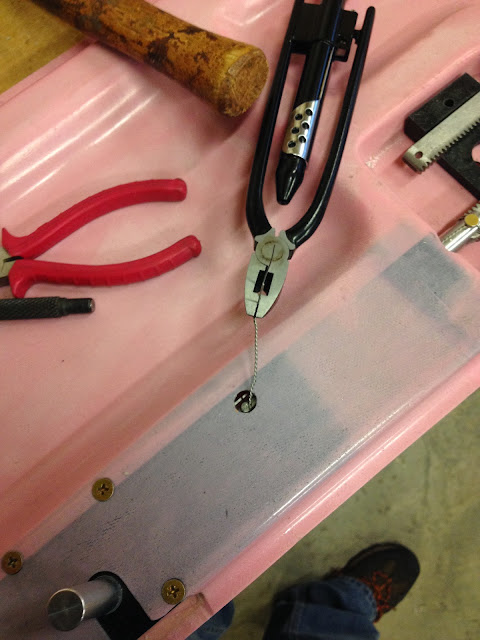
This is how I safety wired my rack attach pins. The safety wire goes through the pin twice for extra strength and to prevent any movement in the pin.


The plane around third latch instructions have you drill a small hole to install a pin through their rack and an attaching rod. To prevent movement in the pin you are supposed to safety wire the pin in place. Ideally you want the safety wire wrapped around the rod to prevent the pin from falling through the rod or pulling out. (note the pin is shown in top LH corner of the pic below) The next couple pictures show how I got the safety wire around a rod through a very small hole.

First I wrapped the safety wire losely around the rod and tucked the ends into the hole. This allowed me to insert the rod into the door while also holding onto the safety wire.

I then inserted the rod into the door and found the wires through the small hole.

I then pulled the wire out using some needle nose pliers. I kept pulling until the wire was now wrapped around the rod where the pin is located instead of near the end (like in the first picture). I then inserted the wires through the pin as shown below.

Pull the wire and move the pin into position simultaneously then tap the pin into place.

Twist the wire.

Clip the excess and tuck into the hole. Pin installed and safety wired.


Handle, latch, and pins installed on doors.

LH door installed.

Locking the door pulls everything in and sits flush with the outside of the airplane.


We got some snow down here in Alabama!...a rare occasion. The couple inches of snow made Jess and I realize just how much we miss the white fluffy stuff. This is the first accumulating snow fall since I built the workshop a few years ago.

Monday, April 15, 2013

Shop Picture on Flying Magazine Site

There is a picture of my shop on the Flying Magazine Website! They put together a photo gallery of RV builders titled "RV Aircraft: A Builder's Journey" featuiring many great guys and their projects. I'm honored to be one of the pictures.

They emailed me to ask permission to put a picture of me in the magazine as well! Cool stuff. The article should be in the May issue...we'll see. I'll make another post if it happens.

Here is a link to the Flying Magazine Photo Gallery. My shop is picture number 16.


...in time I'm sure this link won't work anymore so I'm going to post a screenshot of the web page, a fun thing to add to my builder's log book....