Showing posts with label door lights. Show all posts

Monday, February 23, 2015

Wiring and Door Switches

Yeah I know I'm really slacking on posts. I'm very far behind. Of course anyone reading this a year from now will just flow from the previous post to this one and think I didn't miss a beat. But if you look closely my lost post was in November and here we are almost at the end of February. Shameful I know. But I have been working on the plane VERY hard, so no worries. I have a lot more posts to put up after this one but no guarantee as to when it might happen.


So my last post we talked about my interior lighting and wires and such. This post continues on that.

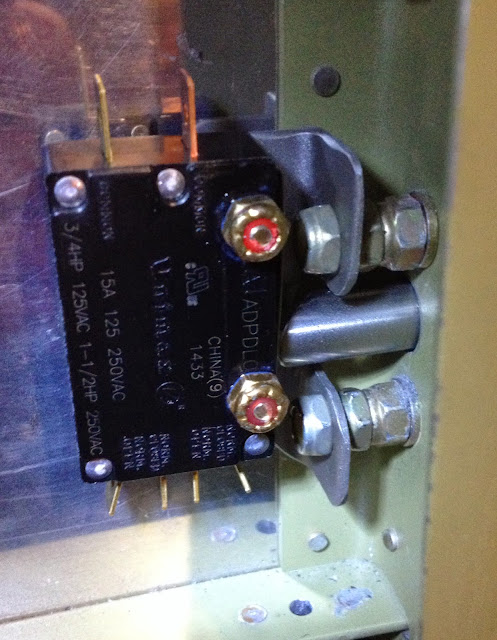
Here are the DPDT switches I'm using for my doors. They control a ground and power loop that flips a relay to turn power on to the control box and turns on the light for the door that is opening. Sitting beside the switch is the small bracket that I made to install the switch.

The bracket installs on the aft side of the door frame and you can see how the pin engages the switch (opening the circuit) when the door is closed. It was a little difficult getting the wrench in there and I did have to use thin nuts instead of the standard thick size.
I ran wire through the rear seat support frame to get to the LH door and this is where the baggage door sensor is going to install...see it hanging out of the tunnel.

I also worked more on the tailcone wiring. I made a connector for the pitch trim servo connection.

Close up showing the connector and the small bracket that will hold the D-sub I'm installing on the pitch trim servo wires.

Tuesday, November 18, 2014

Light Power Test

The moment I've been waiting for.....power! The overhead is officially done! I mean done, finished, ready to fly! Exciting to say that a part of the airplane is complete. Here are some pics of the first power test.

I later found out that I can easily remove and install the overhead panel without any additional support, but for the picture I needed some boxes to support the panel. This shows the extra wire length that allows you to make all the connections in the overhead before installing it. ...it's a lot easier than it looks.

Powered on! The switches light up, the overhead recessed light shines, the reading lights are nice and bright, the dimmer works and it looks great. The pictures suck at showing the lights. I tried turning the lights off for a better effect but the iphone just doesn't cut it.

And here is the door light. When I turned the lights off I was pretty happy with the way this is going to work out.


Ayla thought it was a lot of fun looking at the lights and pushing buttons, plus it's just cool being in the plane with Daddy!

Wednesday, April 23, 2014

Door Lights

I wanted to have some lights that shined on the wings when the doors opened. The gull wing doors provide a perfect spot to install some small LED lights that turn on when the doors open and thus shine down illuminating the wing walk and step. It's been a chore finding all the parts to install these and coming up with how to install them. I think I've got a good plan now, but it's going to be completed over several sporadic steps along this build. Sorry I can't sum the install up into a single post, if I remember when these are finally installed I'll link back to this post.

Date and Time
Mon 21st -1.5hrs- Installed LED light on door

I had planned on doing these since I started building the plane, but I was so excited to glue the two door halves together that I forgot to run the wire. This would have been much easier to do before gluing the door halves together. So I had to improvise; I drilled my wire exit hole near the hinge and the wire entrance hole near the bottom where I wanted to install the light. I used a straightened hanger to push through the door starting at the top hole near the hinge and another small piece to hook the end of the hanger and line it up with the lower hole. Before pushing the hanger through I smoothed out and rounded the end to minimize it tearing through the internal sound proofing. 

I then taped the wire to the end of the hanger and pulled the wire through the door. The wire will later get a connector, shrink tubing, and sealed. 

I then used the light as a drill guide. Making sure the light covered the wire entrance hole I drilled two #30 holes and used two blind rivets to install it. The rivets shown below worked really well. The head slid down into the recessed hole of the light and were the correct length to secure the light. I really lucked out because it just so happened I had four of these laying around. 
 
I set the door in place to see what it will look like. I like it. Eventually I'll scuff and paint the light the same color as the door. That should give it a real finished look.