Showing posts with label baffles. Show all posts

Monday, November 17, 2014

Baffle Material

This part wasn't as bad as thought it was going to be. My Dad was in town which gave us a chance to work on this together and the extra set of hands was helpful. For those that don't know the baffles seal the upper part of the engine creating a plenum. This makes the air that is flowing into the engine cowling to pressurize and forces it down in between the cylinders thus cooling the engine. So we don't want any gaps. The pressurized air should force the pieces of rubber together forming the seal.

Lots of planning and templates goes a long way when making the baffle fabric.

You have to cut around the cylinder. Later this will get sealed up with some RTV.

Here are a few shots of everything installed. Notice my really nice RTV job! (NOTE: you have to thoroughly clean the release agent off the material before you RTV. I would do this before you install them.....wish I would have)


Next, I made baffle close outs for the air ramps. Not sure if these will stay on the cowling or get installed after the cowling is on. I'll figure out which one is easier as I use them. But, just in case I added nutplates to the bottom.

Here is the LH one sitting in place. Two screws and it's installed.

Engine Mount Covers

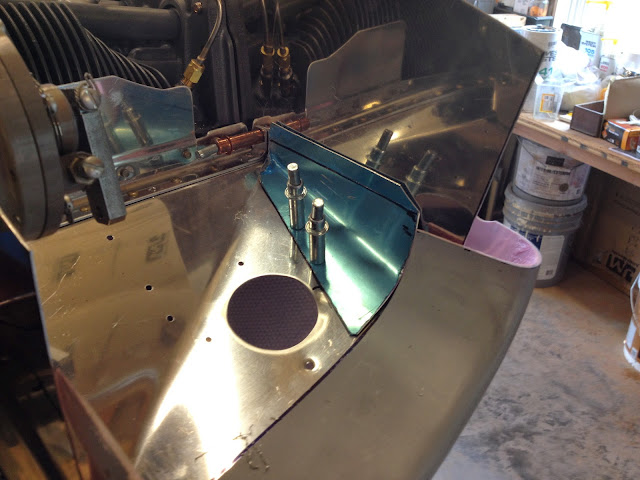
The engine mount covers from Aerosport, I think, are important. They do a great job sealing the plenum around the engine mount that protrudes through the baffle. I had trouble installing the LH cover, though. I wish the flanges were double the size on the covers and this issue could have been avoided, but others have installed them with no issues (such is life). After installing the cover I realized that the nutplates were going to hit the mount, not good. So, I drilled them out and moved them. But I still wasn't happy with how close they were. So, I decided to add a flange to the mount covers. Basically, I made a ring that attaches to the cover plate and then screws into the baffles allowing the nutplates to have plenty of distance from the engine mount. Problem fixed.


Tuesday, October 7, 2014

Service Bulletin, Standby Alternator, Baffle Install, Re-clocked Prop Governor

I have done A LOT since my last post.
- Completed Service Bulletin 14-08-29
- Installed the Standby Alternator
- Painted and installed baffles
- Reclocked my Prop Governor
- Measured for my fluid lines
- Body work on upper air ramps (Featured on later post)
- Installed cowl flaps (Featured on later post)
- Started routing my #2 wire

Dates and Times
Sept
20 -4.5hrs-
21 -5.0hrs-
22 -1.25hrs-
23 -1.25hrs-
24 -1.0hrs-
25 -1.0hrs-
26 -8.25hrs-
27 -3.0hrs-
28 -5.5hrs-
Oct
1 -1.0hrs-
3 -7.5hrs-
4 -3.5hrs-
5 -5.5hrs-


The service bulletin from Vans has you install a spacer plate between the engine mount elastomer plate and the elastomer itself. I scratched my head for a while trying to think of the best way to get the weight off the front gear so I could remove the elastomers. I first thought, and will probably do from now on since the prop would add even more weight, pulling down on the tail to raise the nose. I personally can hang from the tip of the tail and can't get the nose off the ground so any kind of weight system would need to be really big and I didn't want to hassle with that right now, I will go this route for maintenance after flying though. So I just used one of the bottle jacks I put together a while back and with some plates to help distribute the load I carefully raised the nose. Worked....but made me nervous.

The spacer plate is designed to space the elastomers off the welds of the gear. My elastomers were bent from the welds so I cut the bends out so nothing would rub in the future.....and that is why they have the spacer now.

I installed my Plane Power FS1-14B backup alternator (30Amps) on the engine "vacuum pad". Also you can see some of the tubing I'm using to measure for my fluid lines.

After I got the baffles installed I noticed that the Aerosport Mount Cover nutplates rub against my engine mount. I wish the flanges were 3 times the size on the mount covers and this would never be an issue. I'm going to have to drill these out and figure out a solution.....really not happy about this one.

Baffles painted and installed....just need to install the baffle material.


I'm real happy with the way my RH ramp turned out. Kinda looks like I know what I'm doing.

I had to re-clock my prop governor control arm so the control cable will be able to fully actuate the governor. Then I re-safety wire it.

Thursday, September 25, 2014

Baffled

Things are moving quickly from one task to another now and it's getting really difficult to keep track of what I'm working on, when, and for how long. The baffles are the last big item to build. So it deserves its own post. 

I had a a soon to be RV builder stop by the shop a few Saturdays ago. He asked to hang around for a while and rivet on some practice pieces while I supervised and advised. He said he learned a lot, so I guess it went well.

The baffles aren't bad. It brings you back to the "good-ol-days" of just smashing rivets and bending tin. 

The times listed below are a mix of many different things including: baffles, oil cooler install, air intake in cowling work, etc.

Time and Dates
Sat 6   -2.5 hrs 
Sun 7  -5.25 hrs-
Mon 8  -1.25 hrs
Tues 9  -1.25 hrs
Fri 12  -7.0 hrs
Sat 13  -5.5 hrs
Sun 14  -5.0 hrs


Cool shot from the loft of the shop.

After the aft baffle parts are riveted together I installed the untrimmed parts for a test fit.


Getting the aft baffles on is a PITA I wound up scratching up the valve covers. I taped them up to protect them from any more scratches.

On the LH air ramp I didn't follow the directions for trimming the part. I instead trimmed it as the marked in the picture. If you follow the directions you could have some edge distance issues with rivets in the next couple steps of the instructions.

RH air ramp bent up and clecoed in place.

LH air ramp bent up and clecoed in place.

This shows how much extra material you're dealing with on the air ramps. Things will get trimmed, A LOT, later.

I moved the scat tube intake farther back than the plans call for to prevent the lip of the cowling interfering.

This is the LH air ramp. You can see how my trim worked out. Nice edge distance on the fasteners.

I had to open the hole to clear the prop governor.

Here are all the components installed with the lower cowling in place. (Note the dancing in the background....I'm pretty sure she was entertaining Ayla :)

Next step was making the conical ramp corner gussets. I made a few templates from paper to get the idea of what kind of shape I would need. Then to the bend I gently rolled the aluminum with my hands on a piece of scrap tubing. It worked pretty well.

RH corner gusset cut and clecoed in place.

LH gusset cut and clecoed in place. I later had to remake this part. The bend I made on outboard baffle wound up pushing the ramp up 3/8 of an inch higher than the cowling lip. So I had to drill out this gusset shown and remake another to allow the ramp to sit lower.

RH gusset riveted in place. I'm really happy with the way this turned out.

I then evenly space the cowling up 3.5" to make marks for my initial cut.

I made a mark 3.75" all the way around the baffling - 0.25" lower than the cowling top - for my initial cut. I cut to that line then placed paperclips around the perimeter of the baffle. Placing the cowling back on pushed the paperclips down. Then I could go back and measure 0.5" from the top of each paperclip and this would give the points I need to have 0.5" clearance all the way around the perimeter of the baffle.

Made the cut and then removed the baffles and prepped for paint. A pile of twisted angled parts.