Tuesday, November 13, 2012

Upper Firewall Brackets

I had some edge distance issues with my upper firewall brackets (WD-1002). They are match drilled through the frames from above and if they are like mine don't line up well enough to leave any reasonable edge distance with the rivets. I even tried using a clamp to pull the tabs into place, but it wasn't enough. So here is how I addressed the problem.

This is the upper left hand firewall bracket (WD-1002). View looking up.
The bracket is made from 0.063" 4130 steel.


Here is a closer view of the holes. View looking forward.
As you can see the edge distance reduces to almost nothing in the aft holes.
Note a total of 9 rivets in the upper tab of the bracket.


I traced the shape of the part using some lexan and marked a cut line just forward of the fourth hole.

Picture of the WD-1002 upper flange after the cut. I used other pieces of steel to shield the existing parts while cutting to prevent any accidental strikes from the cutting wheel.


The new parts. I don't won't to call them repair parts, but I guess that's what they are.
Starting on the left: upper spacer, aft spacer, splice strap.
Upper spacer is 0.125" 6061-T6 shaped to taper down to 0.063" on the outboard side
Aft spacer and splice strap are 0.063" 4130 steel (same material as the WD-1002 Bracket).


The spacers and strap celecoed in place. The upper spacer is sitting under the primer green firewall stiffener and above the cut upper tab of the firewall bracket. The aft spacer is sitting just aft of the cut. and the splice is on the bottom spanning the entire length.
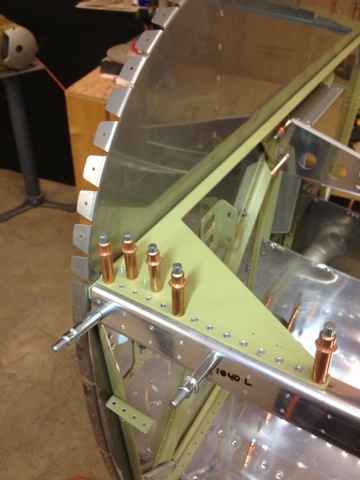

With this view you can see the 4 new holes in the firewall stiffener web inboard from the existing line. These four new holes go through the upper spacer, upper firewall bracket tab, and the splice. These holes are important as they allow the upper firewall bracket tab to have 9 rivets as was originally designed (now with better edge distance), replacing the 4 holes removed. Equally important is that the new holes go into the spice to carry the load into the aft holes as was originally designed.


View looking down with rivets installed.


Ignore the sloppy green primer. View looking up and forward. You can see the new 4 inboard holes making a total of 9 rivets shared by the tab and the splice. The splice strap actually extends beyond what the original tab did picking up 5 additional rivets aft of the original. The splice, being made of the same type of material, can carry the load into the existing structure as intended. The "repair" or "redesign" is actually stronger than the original with the improved edge distance and additional aft rivets.

Fuselage Side Skins 2

I have been forgetting to take pictures as I go so there isn't much to see here. All the parts are made, deburred, countersunk, and primed for the side skins. I also made the repair for the WD-1002 upper firewall brackets and it is now stronger than before. Cutting steel and aluminum has become as common in my workshop as wood once was.

I also made a new countersink extender thing from some threaded rod. Allowed me to countersink the six outer rivets on the forward bulkhead. The instructions call for double flush rivets in these locations but the countersink stop is too large to fit in the flange of the bulkhead, so I extended above it.

11/6 2.0 countersink parts
11/7 2.0 countersink parts
11/10 4.0 made repair for firewall bracket
11/11 6.0 deburr, countersink, prime, dimple
11/12 8.0 riveting

Monday, November 5, 2012

Fuselage Side Skins

There is a portion of the side skins you have to bend yourself. It's a little tricky at first but then you work out the process and finish with a decent curve. There is a sharp bend in the front and it opens to a larger bend in the aft, opposite that for the forward skins. There is a lot of drilling which means there is a lot if deburring coming as well. The shop floor is filled with tiny bits of aluminum.

I test fitted the landing gear brackets which was a pain to get the holes to line up. I had to bend the lower flange further inboard on the LH side and didn't use the shim that's called out, but the RH side needed it. These things are made of thick steel so as you can imagine it was no picnic to get them to agree to go in.

Side note: I had a couple parts missing from one of the bags, a quick call to Van's and they're mailing them to me.

When fitting the skins I noticed the RH side didn't match well with the curve of the longeron. So I used a trick I learned from an old sheet metal mechanic, the tapered shim. Simple really, just start with a sheet as thick as you need and thin it out on one side using a belt sander. It smooths out the transition from shim to no shim. I have a pre-shim and post-shim picture posted.

The only major issue with this section so far is with the upper firewall brackets (WD-1002). I'll write a detail post about that when I get it all worked out.

10/31 1.5 started bending skins
11/1 3.0 bent aft side skins
11/3 5.0 drilled aft skins
11/4 6.0 fwd skins bending, etc
11/5 9.0 fwd skins drilled, other work

Wednesday, October 31, 2012

Lower Fuselage

Finally time to connect the two halves of the fuselage together! I bolted the two halves together first with the provided spacers and some regular Lowe's bolts, they are temporary anyway. I riveted as much as I could by myself and then my very patient, productive, helpful, enthusiastic, ....oh and good looking friend, Adam, came by to help finish riveting. (I say those things as positive reinforcement so he helps again : ) hope it works) We turned the whole thing on its side to reach both sides. There are a couple rivets that the bucking bar couldn't get to, since they were under the seat support brackets...blinds might go there haven't decided yet. There are six rivets in the skin on the outboard side that go into the bulkhead assembly that need to be double flushed. So the bulkhead needs to be countersunk on the flange, don't know how I'm doing this yet either. I think I need a new tool to do the job.

The stand worked great. It rolls around really easily. I posted more pics as promised.

Since the work table was now free of airplane I decided to build the baby a set of chest-of-drawers that we needed. Started and finished it this past weekend. It's made almost entirely from the wood crating the airplane was shipped in, pretty neat.

There is a picture of the shop using the new panorama option on the iPhone. I had to try it out on something.

23 3.5 riveted fuselage halves
25 1.75 bending longerons
26 1.5 bending longerons


Monday, October 22, 2012

RV-10 Fuselage Stand

I drilled out the F-1015 ribs without any damage to the airframe, amazingly. Some rivets are really easy to drill out and some others are tucked away deep inside and going through multiple layers of aluminum. I drilled a #40 hole into the head of the #4 rivets, popped the heads off with a punch, then used the rivet gun against the punch to "hammer" the rest of the rivet out of the hole. This seemed to be the best way to prevent any damage to the airframe.

The entire front half of the lower fuselage is almost complete. I prosealed the skins under the firewall and, what started as an accident, prosealed the splice of the fwd and aft skins. I started prosealing the wrong side of the skin but ran with the mistake anyway, I figured it wouldn't hurt to proseal the first splice aft of the engine and whatever it feels like spewing out.

I also built a stand for the fuselage so I can get this thing off the workbench. I have a single picture right now, after the airplane is sitting on it I'll try and remember to take some more detailed pics.

Also, last weekend we had a trip up to STL to visit family. Solid IFR for about an hour and a half and I kept thinking how synthetic vision will make this so much better, not to mention a functioning autopilot. I gave my wife a little flying lesson on the way up (VFR), since the autopilot wasn't functioning, that was fun and helped pass the time. On our way home we had a monster tailwind and reached 165kts groundspeed, RV-10 speeds!, in a C172.

Date Hrs
16 2.5 Pro sealed skins
17 2.0 found rib problem
18 2.0 drilled out single rib
20 8.0 drilled second rib. Bolted two halves together. Built stand. Bolted more things. Bolted a couple other parts. Riveted seat well tops.
21 4.0 Started bending longerons

Friday, October 19, 2012

Fuselage Frustration

I am working on Section 28 of the plans and started clecoing in place the F-1004K Center Section Side Plate when I noticed I made a big mistake. Back in Section 26 of the plans when I riveted F-1015A Outboard Seat Rib in place I accidently placed the joggled flange of F-1015A outboard of F-1004D Channel when it should be inboard, ie that little tab should be behind the channel.

 So, I have a problem. I first drilled out the 21 rivets on the bottom that go thru the skin. Tried twisting the rib to get the flange behind the channel….didn’t work. So I started brainstorming ways to avoid drilling out the rivets that attach the aft end to the fuselage (they are a pain to get to and was afraid of really screwing up a rivet hole)…I could make a shim above the flange, I could cut the flange and create a “repair” attaching the two parts together…..wait….will the holes need to be dimpled…..wait should all the holes be dimpled in the F-1015A Rib? After scouring the plans and the web I discovered that YES they should! The plans completely skip over this. You dimple F-1018 Rear Seat Rib on step 6 on page 26-5, but there is no mention of F-1015A. A simple “and F-1015” after "dimple holes" is all that would be required. Frustrating.

Apparently you’re also supposed to know to dimple the holes in the F-1015B channel before installing the F-1015A Rib. So, the ribs on both sides are coming out and this would happen regardless of the mistake I made in the beginning.


Thursday, October 11, 2012

Back riveting and baby kicks

A lot of time went to installing nutplates and making small assemblies. I did get the stiffening angles back riveted to the lower skin, which seemed like a big step.

I'm getting excited; the two halves of the fuselage will be coming together soon! And, the baby is really starting to kick! Seeing my wife's stomach jump is a pretty wild sight!
(3.25)