Showing posts with label Filtered air box. Show all posts

Tuesday, September 2, 2014

Filtered Air Box Alt Air Door Redo

A few posts ago I had a picture of my FAB with fiberglass layed out to make an alternate air door. Well, I had a real hard time getting the piece of aluminum I was using as a spacer back out of the glass I layed up. While I was pulling and cussing and pulling more I realized that the glass wasn't really adhered to the box very well. And eventually it all just popped right off. SO...back to the drawing board for the alternate air door. I should have trusted my instincts and made if from aluminum in the first place.

Mon (Labor Day) Sept 2 -2.75hrs- Worked on Filter Air Box and final install of throttle body

Here are the pieces that make up the alternate air door. Bottom plate, two middle spacer strips that are bit thicker than the sliding plate, two upper retaining strips, and one strip across the back to act as a stop.

The four center holes fall inside of the filter so those will be riveted in place with button heads to the FAB. The outer rivets are countersunk since they fall under the filter.

Here is a pic of the door installed. The four center holes on each side of the strips attach to the FAB and the outer ones along the forward and aft edge are just countersunk as you saw in the above picture. Also you can see that instead of fiberglassing a tube into the box bottom for a drain tube, I went a different route. I used one of Vans unused static port compression fittings and cut the threaded part down to the thickness of the FAB. Then installed it into the box and globbed up some flox epoxy and glued it in place. With the compression fitting installed I can swap out the tube if I need to. It also seemed like an improvement over the original idea and was easier to install.

I made a little hat channel to attach the cable hardware to.

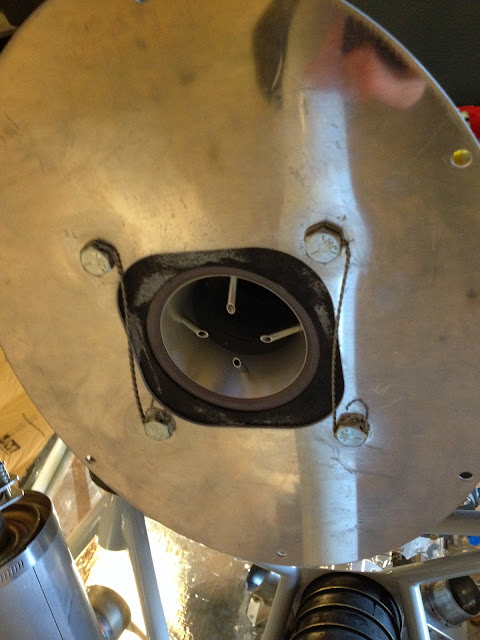
This is a picture looking up at the the throttle body. The throttle body was installed per Lycoming Service Instruction No. 1484C. Then the upper FAB plate is bolted on and safety wired.
The FAB clecoed in place.

I currently have the baffle material on the inside of the FAB neck, but after thinking about it I would prefer to have it on the outside. My thoughts were that this would be better for airflow, but if a piece of that tore loose it would really block air intake. So, I'm gonna drill it out and move the material to the outside. Then I can finally finish the cowling transition piece that slides into the FAB opening.

Friday, August 29, 2014

Filtered Air Box

Catching up on posts still.

The filtered airbox at first seemed like it was going to be a lot of headscratching trying to figure it all out since the instructions are a bit lacking in the information department. But after I saw some pictures of what the end product was supposed to be it became pretty easy.

First I fluted the metal top to match the fiberglass bowl.

I then clecoed it in place allowing the filter sit just a little above the top so it would be completely closed out when I screwed the top plate into place.

I unbolted the closeout panel for the throttle body and let the little bit of oil drain out. Then I temporarily installed the throttle body in place for all the fitting. I didn't do a permanent install since it will have to come back off again when I fully drain the storage oil. The picture shows what is pretty close to the final install. You can see the cut out on the side that is required to clear the arm of the throttle. Pretty simple stuff. Cut the clearance out and match drill.

The air intake in the lower cowl has to be extended inside to meet up with the FAB. So they supply a foam block to help create the extra internal lip. I cut down the block to fit inside the lower cowl.

You're supposed to use the block to form the internal extension. This is a pic of the foam block in place with the lower cowl installed. You do need to trim the front of the FAB to allow for clearance of the lower cowl.

I then started carving out the inside of the foam block to make a "tunnel" from the lower air intake to the front of the FAB.

This produced a ring like this. ....this story will continue later....still working on this part.

I want to able to open and close the alternate air door (stock design only allows you to open and not close) from inside the cockpit. So I cut out my hole in the bottom of the FAB and then using a scrap piece of aluminum (taped up for a release agent) formed what will become a track for the air door to slide  back and forth in. I also fiberglassed my drain tube in place.