Showing posts with label doors. Show all posts

Thursday, June 12, 2014

Doors, Doublers, and More

Lots of work getting done at the Twilbeck Airplane Factory. Which is good because for a while it felt like I was inching along at a snails pace just sanding my life away and not really progressing. Then, another weekend and several nights of work were taken up by a ultra high level double top secret door handle design I have been working on. Don't worry the public will know about it soon and you can have a set of your own if you like. But until then keep the news of the ultra high level double top secret handle project to yourself.

After what felt like the doldrums of progress finally subsided the day of enlightenment was finally upon me. I took a Friday off and just worked all day on the plane. Getting a lot of things crossed off the list. Nothing major or any kind of groundbreaking milestone but it felt really good to complete so many tasks. 

Dates and Times
Mon 19th -1.25hrs- Test fit ADAHRS, removed doors and hinges
Tues 20th -1.0hr- Made and drilled antenna doublers 
Sat 31st -5.0hrs- ultra high level double top secret handle project test fitting
Sun 1st -6.0hrs- more ultra high level double top secret handle project work
Mon 2nd -1.0hr- ultra high level double top secret handle project stuff
Tues 3rd -1.0hr- ultra high level double top secret handle project things to do
Wed 4th -1.5hr-ultra high level double top secret handle project test install
Fri 6th -8.0hrs- The big day of work - created covers for the door hinge pockets, filled in the guide blocks for the door, body work around the edge of the door frame on the cabin top, glued the NACA vents in place with Lord Adhesive, primed and painted the door hinges, other misc tasks
Sat 7th  -4.75hrs- Sanded the door interiors and some other misc work
Sun 8th  -4.75hrs- Sanded the door frames and started riveting tailcone skin! 
Tues 10th  -1.5hrs- Planned routing for tailcone

Sorry no pics of the ultra high level double top secret handle project.....yet.

I cut out the shapes I needed from the scrap door skin to build the hinge covers. Mixed some flox and kinda glued them in place then did a wet layup over the top for extra rigidity.

Once everything was sanded and filled and sanded again it looked really nice. It was actually pretty easy work. I also sanded around the perimeter of the window to remove some excess Lord Adhesive that was smeared around.

I used the Lord Adhesive to glue tabs inside the overhead that will be used for cable and wire routing. Worked really well.

This is a view looking forward at the windscreen. I taped up a scrap piece of aluminum to protect the windscreen before making the cut in the glareshield. See the half moon shape in the middle of the picture. That will allow clearance for the cables and wire to travel from the back of the airplane through the overhead then down the center post of the windscreen and into the subpanel. After making the cut I lined the edge with the plastic grommet to protect the cables.

I used Lord Adhesive to install the NACA vents...no big deal here.

Here is a shot of the square door frame edging. Some areas needed a lot of buildup to line up correctly with the doors. There are actually some flat spots on the cabin top and the doors curve very nicely. So you need to build all that up to make the curves match up. The square edge will be given a slight radius during the final fitment of the doors. I finished the entire perimeter of the door frame and am very pleased with how it turned out. If you remember in my previous post where I did the window edging and body work that I filled around the doors edges. That created the base of where the edges needed to be. Now I went back and had to "back fill" inside the door frame to meet the edge that was created before. (This will all make sense if your actually doing this) I then sanded it all down with a small block of wood and sandpaper to make a miniature sanding block that created a perfect flush finish to the edge.

I also back riveted my GPS antenna doublers to the tailcone skin and then started installing skin.

Monday, February 24, 2014

Door Frame Edges and Strut Bracket

A little more work on the doors and I'll be stopping for a while. I need to figure out some things on the exterior handles before I do all the finishing work.

I continued with what I could and that was thickening up the lip around the door frame edge. I used the Mcmaster Carr seal as a mold. I filled the seal up with epoxy/flox, tapped the seal into place with a rubber mallet, and then closed and latched the doors to let it dry. The next day things looked pretty good but the edges needed to be filled in a few areas and the entire process repeated in others where the epoxy door edge didn't make good contact. I also installed the planearound delrin pin guide blocks (sorry I don't have pics of that).

Here is detailed brake down of the tasks I completed
Sat 15th -4.5 hrs-
put seal back on RH Door frame
cleco RH door to fuselage
redrill holes for hinges as required
recountersink holes for hinges as required
screw door onto hinges
close door and test fit
work on gas strut bracket on both doors
install delrin guide blocks
find and mark thin areas of gutter for build up
mix epoxy and sqeeze into seal
close and latch doors while epoxy dries

Sun 16th -2.0hrs-
sand the door frame
re-epoxy areas that didn't work first time
later that day take the canopy off

Total Time on Doors

55.0

You can see the area where I had to build up the lip. The seal leave behind a nice ridged edge.

This is the wooden spacer I made to locate the door strut bracket.

Tuesday, February 18, 2014

Door Handles and Planearound Latch

The handles take a lot more work than what you think. It feels like a lot of running around in circles. You complete a few steps than need to take things apart only to put them back together again. There is timing of the door pins, correct thread lengths, and all kinds of fitting and clearance issues. I now have the door latches in working condition with the pins installed. The handles slide the rods back and forth pretty smoothly. So I am happy with the result thus far....although it felt like a lot of work to get here.

Dates and Times
Sun 9th -3.75 hrs- Door latch work
Mon 10th -1.25 hrs- Door latch work
Tues 11th -2.0 hrs- Door latch work
Wed 12th -4.5 hrs- Door latch work
Somewhere during this time I also located the pin holes and test fitted the LH door.

Total Time on Doors
48.5


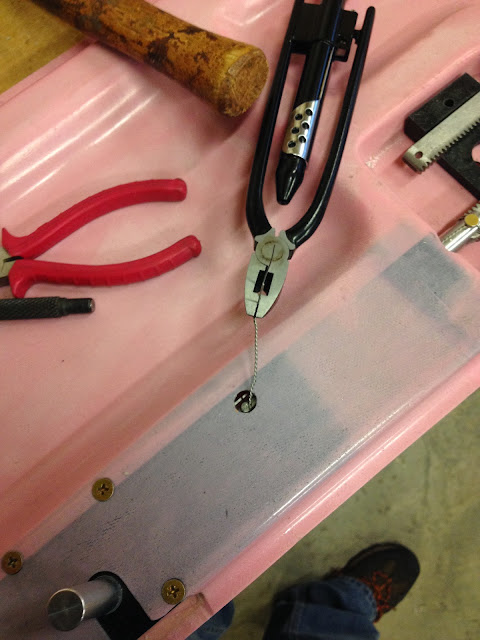
This is how I safety wired my rack attach pins. The safety wire goes through the pin twice for extra strength and to prevent any movement in the pin.


The plane around third latch instructions have you drill a small hole to install a pin through their rack and an attaching rod. To prevent movement in the pin you are supposed to safety wire the pin in place. Ideally you want the safety wire wrapped around the rod to prevent the pin from falling through the rod or pulling out. (note the pin is shown in top LH corner of the pic below) The next couple pictures show how I got the safety wire around a rod through a very small hole.

First I wrapped the safety wire losely around the rod and tucked the ends into the hole. This allowed me to insert the rod into the door while also holding onto the safety wire.

I then inserted the rod into the door and found the wires through the small hole.

I then pulled the wire out using some needle nose pliers. I kept pulling until the wire was now wrapped around the rod where the pin is located instead of near the end (like in the first picture). I then inserted the wires through the pin as shown below.

Pull the wire and move the pin into position simultaneously then tap the pin into place.

Twist the wire.

Clip the excess and tuck into the hole. Pin installed and safety wired.


Handle, latch, and pins installed on doors.

LH door installed.

Locking the door pulls everything in and sits flush with the outside of the airplane.


We got some snow down here in Alabama!...a rare occasion. The couple inches of snow made Jess and I realize just how much we miss the white fluffy stuff. This is the first accumulating snow fall since I built the workshop a few years ago.

Tuesday, February 4, 2014

Prepping For Handle Install

With the doors fit I need to get the handles installed to find out if I need to make any final adjustments to the fit and trim. So it's back to working on the handles, pins, and Planearound third latch install.

I'll let the pictures tell the story...

Date and Time
February 2nd
-4.75 hrs- Worked on prepping doors for handles, latches and Planearound third latch


Total Time on Doors So Far
37.0 hrs

First you use the Vans plastic blocks to drill the proper hole locations. The Vans blocks need to be trimmed and shaped in order to fit in the pockets.

Then it's time to trim the planearound block to fit in the same pocket.

I slid a drill bit through the center hole to align the blocks. I then marked the planearound block for it's initial cut. After cutting and then shaping the block to slide into position in the pocket you match drill from the outside into the planearound block from the holes you made earlier.

Don't forget to cut the racks in half and NOT per the plans...luckily I remembered.

I highly recommend this bit on the dremel to cut out small holes in any of the fiberglass. They work really well. This is the initial cut for the third latch mechanism.

You then mark a hole and open it up to 0.5" (If I remember correctly). I used the same bit to align the holes and the outer part of the third latch mechanism. I then match drilled into the inner skin for the screw holes.

After I drilled all the holes I finished making the slot that is need to install the latch. I cleaned up the opening and epoxied the spacer blocks into place. The third latch kit includes small hollow blocks to reinforce the area around the latch mechanism. I filled the blocks full of epoxy/flox and then forced them into position. Look inside your door before things dry to ensure no epoxy will be blocking the rods that are installing in there later

I also cut open the access holes for the racks in the side pockets.

Starting Door Seals

With the door separation saga behind me (at least for the time being) I decided to move on and work on the door seals. As I mentioned in a previous post I made a mark 0.25" from the inside door skin down onto the lip of the cabin top gutter. Today is the day to trim and sand the cabin top gutter to get the doors to fit with the McMaster Carr door seal. 

I'll let the pictures so you my results...

Date and Time
February 1st
-5.0 hrs- Door trim work


Total Time on Door So Far
32.25 hrs

Unseasonably warm day allowed me to do all the nasty sanding and trim work outdoors! No dust in the shop this time.


After sanding down to the 0.25 mark on both sides I clecoed the door into place using my upper and lower attach tabs. With the door clecoed in place I could see places that needed a little more trimming to have that 0.25" gap I was looking for. Remove the door and the top and sand some more. The second fit looked good so I installed a small section of the door seal as a trial fit. You can see how the trim is about 50% squished which is what i was looking for. I installed the small section in a few test spots and it looked good.

Now feeling good about the depth of my gap I installed the door seal completely around the perimeter of the opening. There are a few spots where the edge is too thin to hold the seal in place, so I will go back and thicken the inside of those edges with epoxy later.

Door seal in place...looks really nice how it finishes the edge off.

I clecoed the RH door into place once again and was really happy with the results. View from inside looking forward. Notice how the seal looks uniformly pressed.

View looking aft...same thing very uniform and no gaps.
After I finished the RH door trial fit I moved on to the LH it worked on the first try! All in all a really productive day!


Door Panel Separation Saga

I've been having trouble with my doors splitting apart along the outer edges.

To assemble them, as previously posted, you epoxy the two halves together with Cab-O-Sil/Epoxy mixture and then clamp everything down and hope for the best. After I cut the perimeter off the door I discovered gaps or voids in the edges of my doors. They didn't seem bad except when I applied a very small amount of force on them with a flat head they just popped right open, spreading the split further down the door. The edges that didn't have any voids have held up well and I plan on leaving them alone. But to remedy this problem I purchased some large syringes from the local farm store and stuck some plastic tubing on the end. This allowed me to squeeze an Epoxy/Flox mixture (notice I'm now using Flox now) into the door gaps until it came spilling back out. I kept going down the entire gap. I then clamped down the edges and cleaned off the excess that squeezed out. I could only do a small section at a time as I ran out of small clamps. So through the week I think I have my doors put back together again. This whole fiasco has made me a little nervous over the doors rapidly de-laminating at a really bad time. I'm going to ponder over a way to test them and I plan on inspecting my new adhesion job very closely. So far they this has worked really well.

Dates and Times
27 Mon -1.25 hrs- re-glued doors
28 Tues -0.5 hrs- re-glued doors
29 Wed -1.5 hrs- re-glued doors

Total Time on Door So Far
27.25 hrs


Notice the split in the door edge. I drilled out the center of the syringe leaving only the outer rim (this would make sense if you had a syringe to look at). I then used hot water to soften the tubing before sliding it over the syringe. I ziptied the tubing on just for good measure. I filled the syringe full of the flox mixture using a craft stick and replaced the plunger. I then flared open the split with a flat head and forced the tubing inside. When in place I squeezed the syringe injecting the flox mixture into the door. It didn't go far, after hitting my insulation that is in-bedded in the door it came flowing back out. Slide the syringe down a little and repeat.


I tried to clamp along the surface as much as possible to get a smooth surface.

Friday, January 31, 2014

Door Handles

I started the door handles last weekend. I wanted to get an understanding of how all the components worked and I just needed a break from the fiberglass. The handles are actually a very simple design once you look things over. A quick study of the plans and holding the parts in your hands it's all takes to get how the things assemble.

The next day I sanded the LH door to it's final size. This took maybe 4 or 5 trial fits and sanding before I got it to a final shape I liked. I also finished installing the hinges on the LH side (RH was completed before). I also made a small 0.25" block to slide along the interior door skin and mark the door gutter on the cabin. The gutters will be sanded down to the 0.25" mark to allow adequate gaping for the McMaster Carr door seals.

Dates and Times
25 Sat  -3.5 hrs- Started working on handles. Also rearranged and cleaned up the shop but this isn't included in the time.
26 Sun -4.75 hrs- Sanded LH door to final size. Finished hinges. Marked gutter edge for cut.

Total Time on Door So Far
24.0 hrs

I had to polish the inside of the handle tube so the internal pin would fit and slide better.

This is how I installed the safety latch pin. I used a zip tie to hold the spring back and held the pin in place with vice grips. The vice grips also slightly squeeze the pin to aid in hammering it into the hole. Be sure to not squeeze the pin where the two sides touch each other as this might damage the pin and it won't stay in the hole as it's designed. Also, I had to open up the slot in the handle tube quite a bit to allow the pin to slide freely up and down.


The handle resting in place inside the door.


The exterior handle sitting in position in all it's ugly glory.


A shot of the progress thus far...see how the upper forward fuselage is installed!


Thursday, January 23, 2014

Started Doors

I started the doors.....oh no! not the dreaded, much complained, endless amounts of work, frustrating, most hated part of the build doors. Yep, those are the ones. And so far so good.

I'm building the doors a little differently, well a lot differently, than what the plans have you do. Although, what I'm doing is not novel. Many before have done the same or similar. I am installing the McMaster Carr seals that so many recommend, and I see why, it will make a very good seal when I'm finished. I will be installing the third latch from PlaneAround. I am also upgrading the struts as I discussed on the previous post. I am not very far into the doors yet but I can already see how all these changes are a great improvement over the Van's original design. My process for installing the doors might be slightly different than others and I won't know if it's for better or worse until I'm finished. Other builders have spent 130-160hrs building these doors. I really hope they won't drag out as long for me....but we'll see.

Dates and Times
Door Times
Sat 18th -3.0 hrs- Broke down finish kit crate (not included in build time). Started doors.
Sun 19th -6.25 hrs- Long day...kept following directions of cutting and such and at the very end of the day I glued the two halves together...11:00 at night.
Mon 20th -5.25 hrs- Cut doors to rough shape. Sanded RH door to almost final shape.
Wed 22nd -1.25 hrs- Worked on door hinges.

Other Work Times
Mon 20th -1.5 hrs- Jess and I installed the upper forward fuselage (sorry no pics...but it looks really good trust me)

Total Time on Doors So Far
15.75 hrs


I clecoed the two halves together and rough cut the window out. All per plans nothing special here. The first cut is very rough and therefore not precise and time consuming. There is no need for that now, that stuff is for later.


I made a hole finder to find the holes on the fuselage. The holes were left open to cleco the door to the fuselage while the two halves are glued together. The hole finder is just two pieces of scrap aluminum riveted together at the end with two rivets. Then drilled at the front end through both layers of aluminum. The bottom hole then has a rivet glued into place to find the hole and the top hole becomes a great way to start drill a hole. (later the same part becomes an edge finder)


I put insulation in my doors. The insulation is 3/4" thick and worked really well with the depth of the door pockets. The insulation was tacked in with RTV and then I placed the outer shell on top to hold it down while it dried.


This is where things get really different from the plans. The bottom of the doors are held in place by clecos per the plans but then this idea is carried around the entire outside edge of the doors. I drilled holes around the entire perimeter into the cabin top (later they will be refilled with epoxy) and clecoed the door in place. This made the door match the curvature of the fuselage really well while the two halves dried together. I think/hope that this saves me a lot of effort and time in trying to get the doors to look nice....but we'll see.
(I should note that I got this idea less than 72hrs before gluing the doors together from Ed, previously mentioned several times on this blog, who got the idea from his tech counselor who happens to be the same tech counselor that Brian and Brandi used, also mentioned several times on this blog. Kind of a weird web of RV-10 awesomeness)


The hole finder is now being used as an edge finder. I should note that I plan on squaring off my door and fuselage instead of the 45 degree angle that Van's has in the plan. So I need to cut the door flush with the fuselage edge. I used the edge finder to mark my cut lines. I just placed a sharpie in the hole and drug the edge/hole finder along the cabin edge perimeter and made my mark. Note the faint gray line that is to the left of the thick black line, that is the cut mark from Van's....it's a little off.


This is also something I did different. I wanted the doors to sit flush with the outside skin (like they will when they're finished) while I continued trimming. So instead of leaving the little ears sticking out on the sides to pick up the alignment holes in the fuselage I made these alignment plates. First with the door clecoed in place on the fuselage in other holes (now cut away in this picture) I just match drilled the plates to the door and then labeled their location. So far this has worked really well for me and I like working with the doors in what will be their final position.


I placed the hinges in their pockets. No problems here. Just followed the directions.


I made two upper attach plates to hold the door top in the position I want it. This should help hold everything in place while I drill the holes for the hinges. Hopefully nothing will shift.