Showing posts with label latches. Show all posts

Tuesday, February 18, 2014

Door Handles and Planearound Latch

The handles take a lot more work than what you think. It feels like a lot of running around in circles. You complete a few steps than need to take things apart only to put them back together again. There is timing of the door pins, correct thread lengths, and all kinds of fitting and clearance issues. I now have the door latches in working condition with the pins installed. The handles slide the rods back and forth pretty smoothly. So I am happy with the result thus far....although it felt like a lot of work to get here.

Dates and Times
Sun 9th -3.75 hrs- Door latch work
Mon 10th -1.25 hrs- Door latch work
Tues 11th -2.0 hrs- Door latch work
Wed 12th -4.5 hrs- Door latch work
Somewhere during this time I also located the pin holes and test fitted the LH door.

Total Time on Doors
48.5


This is how I safety wired my rack attach pins. The safety wire goes through the pin twice for extra strength and to prevent any movement in the pin.


The plane around third latch instructions have you drill a small hole to install a pin through their rack and an attaching rod. To prevent movement in the pin you are supposed to safety wire the pin in place. Ideally you want the safety wire wrapped around the rod to prevent the pin from falling through the rod or pulling out. (note the pin is shown in top LH corner of the pic below) The next couple pictures show how I got the safety wire around a rod through a very small hole.

First I wrapped the safety wire losely around the rod and tucked the ends into the hole. This allowed me to insert the rod into the door while also holding onto the safety wire.

I then inserted the rod into the door and found the wires through the small hole.

I then pulled the wire out using some needle nose pliers. I kept pulling until the wire was now wrapped around the rod where the pin is located instead of near the end (like in the first picture). I then inserted the wires through the pin as shown below.

Pull the wire and move the pin into position simultaneously then tap the pin into place.

Twist the wire.
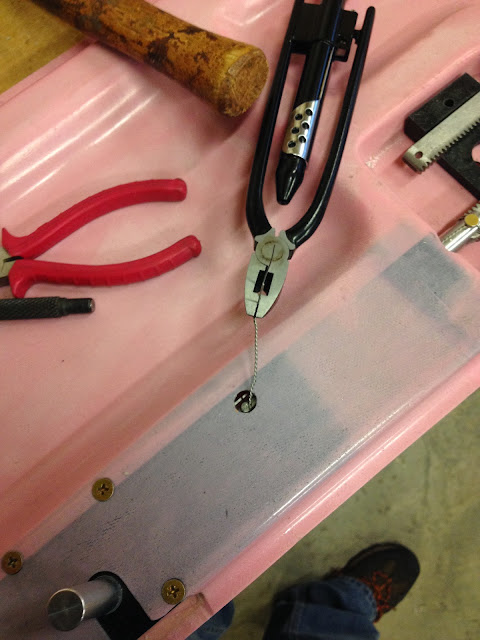
Clip the excess and tuck into the hole. Pin installed and safety wired.


Handle, latch, and pins installed on doors.

LH door installed.

Locking the door pulls everything in and sits flush with the outside of the airplane.


We got some snow down here in Alabama!...a rare occasion. The couple inches of snow made Jess and I realize just how much we miss the white fluffy stuff. This is the first accumulating snow fall since I built the workshop a few years ago.

Tuesday, February 4, 2014

Prepping For Handle Install

With the doors fit I need to get the handles installed to find out if I need to make any final adjustments to the fit and trim. So it's back to working on the handles, pins, and Planearound third latch install.

I'll let the pictures tell the story...

Date and Time
February 2nd
-4.75 hrs- Worked on prepping doors for handles, latches and Planearound third latch


Total Time on Doors So Far
37.0 hrs

First you use the Vans plastic blocks to drill the proper hole locations. The Vans blocks need to be trimmed and shaped in order to fit in the pockets.

Then it's time to trim the planearound block to fit in the same pocket.

I slid a drill bit through the center hole to align the blocks. I then marked the planearound block for it's initial cut. After cutting and then shaping the block to slide into position in the pocket you match drill from the outside into the planearound block from the holes you made earlier.

Don't forget to cut the racks in half and NOT per the plans...luckily I remembered.

I highly recommend this bit on the dremel to cut out small holes in any of the fiberglass. They work really well. This is the initial cut for the third latch mechanism.

You then mark a hole and open it up to 0.5" (If I remember correctly). I used the same bit to align the holes and the outer part of the third latch mechanism. I then match drilled into the inner skin for the screw holes.

After I drilled all the holes I finished making the slot that is need to install the latch. I cleaned up the opening and epoxied the spacer blocks into place. The third latch kit includes small hollow blocks to reinforce the area around the latch mechanism. I filled the blocks full of epoxy/flox and then forced them into position. Look inside your door before things dry to ensure no epoxy will be blocking the rods that are installing in there later

I also cut open the access holes for the racks in the side pockets.