Tuesday, November 13, 2012

Upper Firewall Brackets

I had some edge distance issues with my upper firewall brackets (WD-1002). They are match drilled through the frames from above and if they are like mine don't line up well enough to leave any reasonable edge distance with the rivets. I even tried using a clamp to pull the tabs into place, but it wasn't enough. So here is how I addressed the problem.

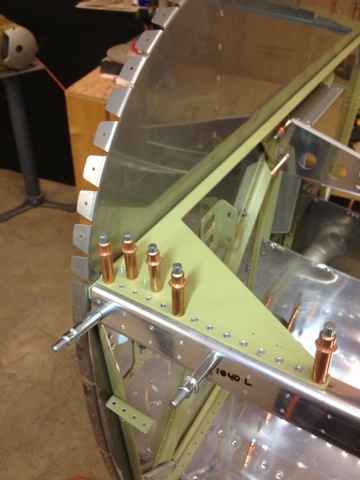
This is the upper left hand firewall bracket (WD-1002). View looking up.
The bracket is made from 0.063" 4130 steel.


Here is a closer view of the holes. View looking forward.
As you can see the edge distance reduces to almost nothing in the aft holes.
Note a total of 9 rivets in the upper tab of the bracket.


I traced the shape of the part using some lexan and marked a cut line just forward of the fourth hole.

Picture of the WD-1002 upper flange after the cut. I used other pieces of steel to shield the existing parts while cutting to prevent any accidental strikes from the cutting wheel.


The new parts. I don't won't to call them repair parts, but I guess that's what they are.
Starting on the left: upper spacer, aft spacer, splice strap.
Upper spacer is 0.125" 6061-T6 shaped to taper down to 0.063" on the outboard side
Aft spacer and splice strap are 0.063" 4130 steel (same material as the WD-1002 Bracket).


The spacers and strap celecoed in place. The upper spacer is sitting under the primer green firewall stiffener and above the cut upper tab of the firewall bracket. The aft spacer is sitting just aft of the cut. and the splice is on the bottom spanning the entire length.


With this view you can see the 4 new holes in the firewall stiffener web inboard from the existing line. These four new holes go through the upper spacer, upper firewall bracket tab, and the splice. These holes are important as they allow the upper firewall bracket tab to have 9 rivets as was originally designed (now with better edge distance), replacing the 4 holes removed. Equally important is that the new holes go into the spice to carry the load into the aft holes as was originally designed.


View looking down with rivets installed.


Ignore the sloppy green primer. View looking up and forward. You can see the new 4 inboard holes making a total of 9 rivets shared by the tab and the splice. The splice strap actually extends beyond what the original tab did picking up 5 additional rivets aft of the original. The splice, being made of the same type of material, can carry the load into the existing structure as intended. The "repair" or "redesign" is actually stronger than the original with the improved edge distance and additional aft rivets.

Fuselage Side Skins 2

I have been forgetting to take pictures as I go so there isn't much to see here. All the parts are made, deburred, countersunk, and primed for the side skins. I also made the repair for the WD-1002 upper firewall brackets and it is now stronger than before. Cutting steel and aluminum has become as common in my workshop as wood once was.

I also made a new countersink extender thing from some threaded rod. Allowed me to countersink the six outer rivets on the forward bulkhead. The instructions call for double flush rivets in these locations but the countersink stop is too large to fit in the flange of the bulkhead, so I extended above it.

11/6 2.0 countersink parts
11/7 2.0 countersink parts
11/10 4.0 made repair for firewall bracket
11/11 6.0 deburr, countersink, prime, dimple
11/12 8.0 riveting

Monday, November 5, 2012

Fuselage Side Skins

There is a portion of the side skins you have to bend yourself. It's a little tricky at first but then you work out the process and finish with a decent curve. There is a sharp bend in the front and it opens to a larger bend in the aft, opposite that for the forward skins. There is a lot of drilling which means there is a lot if deburring coming as well. The shop floor is filled with tiny bits of aluminum.

I test fitted the landing gear brackets which was a pain to get the holes to line up. I had to bend the lower flange further inboard on the LH side and didn't use the shim that's called out, but the RH side needed it. These things are made of thick steel so as you can imagine it was no picnic to get them to agree to go in.

Side note: I had a couple parts missing from one of the bags, a quick call to Van's and they're mailing them to me.

When fitting the skins I noticed the RH side didn't match well with the curve of the longeron. So I used a trick I learned from an old sheet metal mechanic, the tapered shim. Simple really, just start with a sheet as thick as you need and thin it out on one side using a belt sander. It smooths out the transition from shim to no shim. I have a pre-shim and post-shim picture posted.

The only major issue with this section so far is with the upper firewall brackets (WD-1002). I'll write a detail post about that when I get it all worked out.

10/31 1.5 started bending skins
11/1 3.0 bent aft side skins
11/3 5.0 drilled aft skins
11/4 6.0 fwd skins bending, etc
11/5 9.0 fwd skins drilled, other work